Stake a high‑end post and a low‑end post at the bed’s length, tie a taut string between them, and use a line level to create a true reference plane; then divide the slope into 4‑8 ft sections, record cut and fill depths, and compute each segment’s volume with the trapezoidal formula, adding 10 % for settling and adjusting for compaction. Lay a square, level foundation on compacted crushed limestone using 2×12 boards, cut and assemble the frame, secure corners with pocket‑hole screws, and adjust each bed’s height by dividing the total drop by the number of beds. Finally, fill with a topsoil‑compost mix, mulch, and check drainage before planting, and the next steps will guide you further.

TLDR
- Establish a level reference line across the slope using stakes, a taut string, and a line level to guide all bed dimensions.
- Divide the slope into 4‑8 ft sections, calculate cut‑and‑fill volumes with the trapezoidal formula, add 10 % for settling, and convert to cubic yards.
- Build a square, level foundation on compacted crushed‑limestone gravel using 2×12 boards, ensuring corner stakes and a stretched level line are square.
- Cut bottom boards to the measured width (e.g., 47 in × 68 in), assemble the frame with pocket‑hole screws, and taper side boards to match the slope contour.
- Adjust each bed’s height by dividing total slope drop by the number of beds, reuse excavated soil for balance, and verify level bases before filling.
Measure the Slope and Mark a Level Plane With Stakes and String
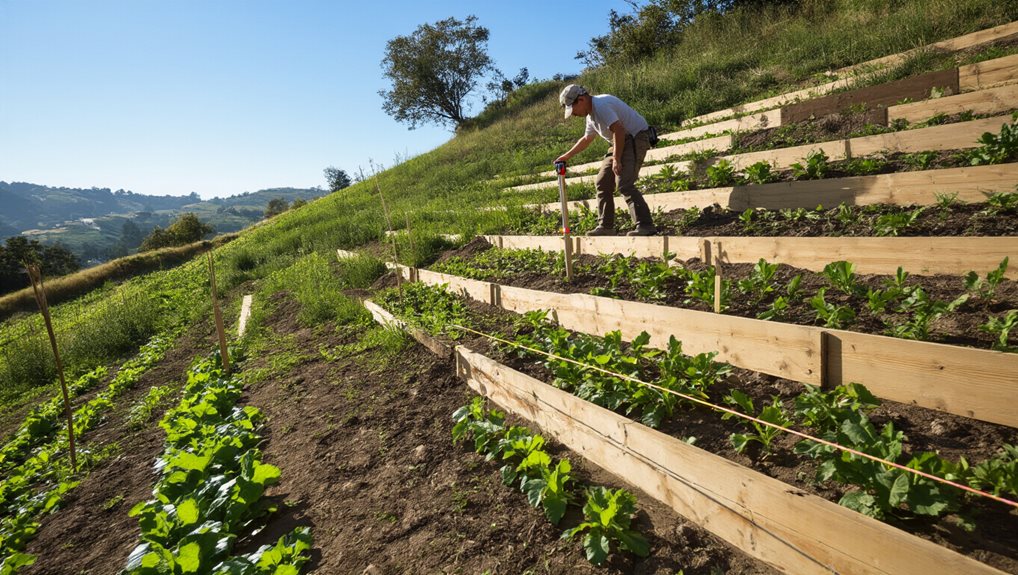
How do you ensure a garden bed stays level on a sloping yard? Begin by driving a stake at the high end of the grade, then another at the low end, spacing them to match your bed’s length. Tie a sturdy string between them, stretch it taut, and hang a line level at the midpoint. Adjust the string until the bubble centers, creating a level plane.
Verify the line remains level across the span, check square angles with a triangle tool, and measure twice before digging. This method gives you a reliable reference for a level, even on a slope.
Use the symmetrical layout to keep the beds aligned with the house and street for easier access.
Calculate Soil Add/Remove for Each Sloped Raised‑Bed Segment
Driving the stakes and string to establish a level reference gives you a concrete baseline for measuring the vertical differences that each segment of a sloping raised bed will require. Divide the bed into 4‑8‑foot sections, record uphill cut depth and downhill fill depth, then compute each segment’s volume using the trapezoidal formula (average height × length × width). Add 10 % for settling, subtract cut soil, adjust for 10‑20 % compaction, convert to cubic yards, and round up for purchase. Integrate proper safety and containment practices when handling soil and tools, especially on uneven terrain. protective PPE
Lay a Square, Level Foundation for Sloped Raised Beds Using 2×12 Boards and Crushed Limestone
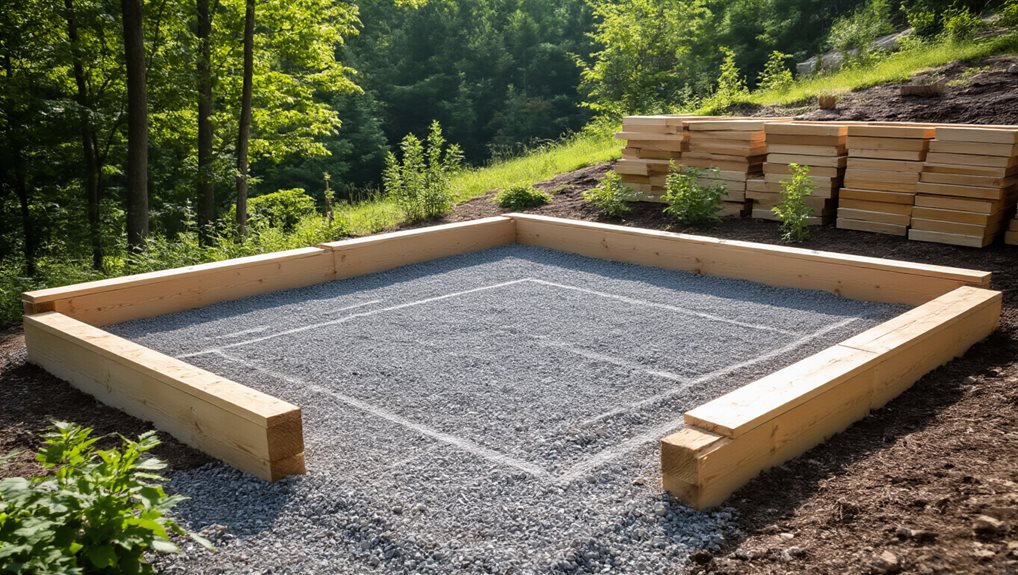
A square, level foundation for sloped raised beds starts with a sturdy footing of 2×12 boards set on a compacted layer of crushed limestone gravel, which provides both drainage and a stable base. Position stakes at each corner, stretch string, level it by raising and lowering corners, then verify spacing with a tape measure. Excavate to achieve a level footing, compact sand if needed, and lay the limestone gravel, ensuring it’s even and firm before placing the boards. Well-drained soil supports robust growth for many raised-bed plantings and helps maintain level foundations over time.
Cut and Assemble Boards for Sloped Raised‑Bed Frames
Where should you start when turning a sloped garden into a sturdy raised‑bed frame? Measure the slope, stake the corners, and string a level line to define a square.
Cut two 47‑inch and two 68‑inch 2×12s for the bottom, verify squareness, then assemble. After the bottom is level, cut matching upper boards, taper sides to the contour, and prepare 22.5‑inch 2×4 corner pieces for the frame.
Install Corner Frames and Secure Joints With Pocket‑Hole Screws
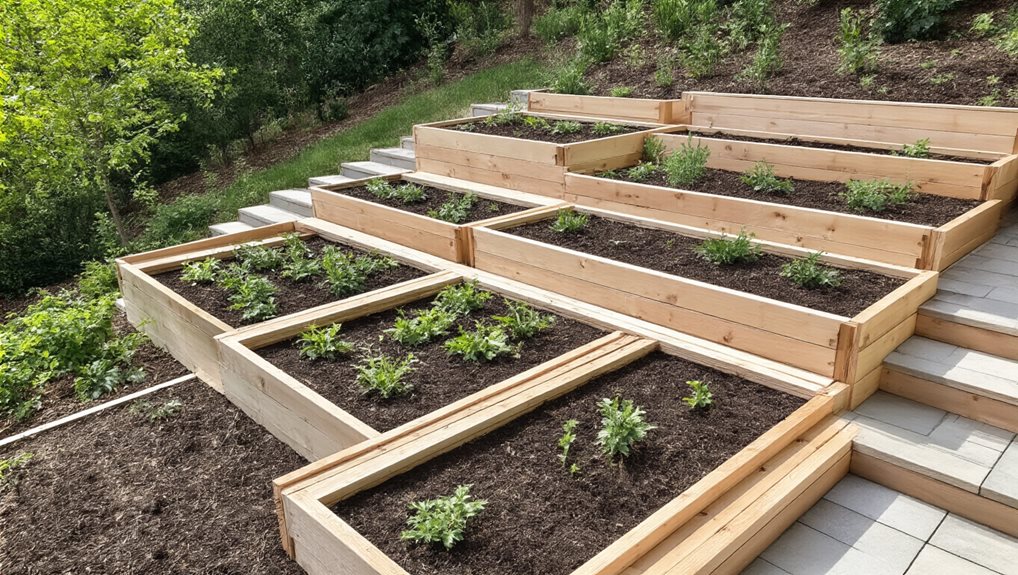
Before you start fastening the corner frames, lay out the pre‑cut boards on the slope and double‑check that each pocket‑hole is positioned exactly where the adjoining board meets; this ensures the joints will be square and the frame will sit level once the screws are driven. Use a Kreg Mini Jig, clamps and a square‑drive bit, drill two offset holes per joint, then drive weather‑resistant pocket screws—preferably stainless or Blue‑Kote—through each hole, checking squareness with a framing square before tightening fully. This creates sturdy, aligned corners that feel like a shared foundation for your garden.
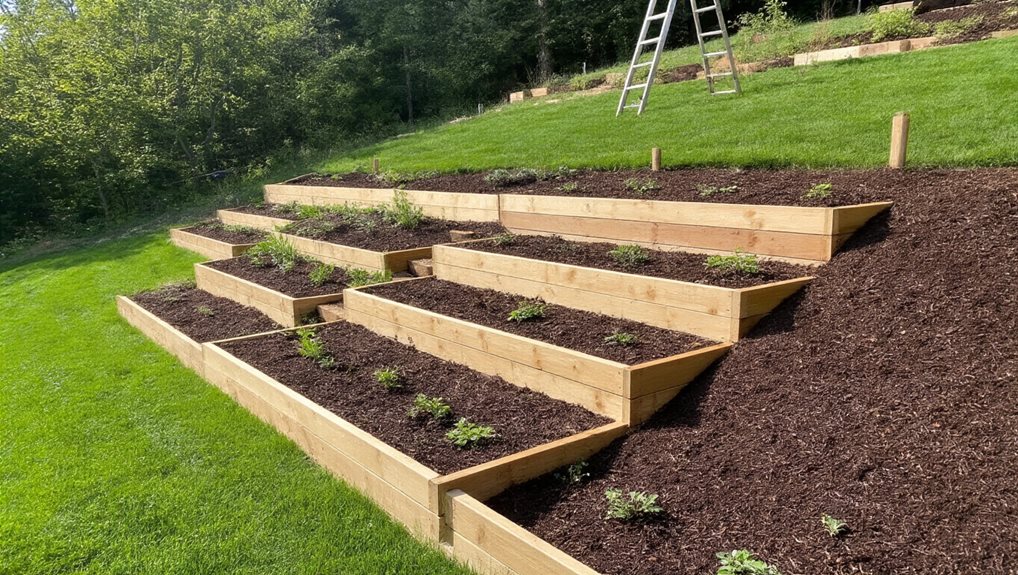
Adjust Sloped Raised‑Bed Heights According to the Soil‑Move Plan
You’ll calculate each bed’s height adjustment by dividing the total slope drop by the number of beds, then apply the exact amount to the high and low edges, reusing the excavated soil from the higher side to build up the lower side. This method keeps the earth balance efficient, minimizes waste, and guarantees every bed sits on a level footing without reshaping the whole slope. The plan also helps manage moisture exchange with the surrounding soil, reducing erosion and promoting stable bed foundations. soil moisture helps inform how much adjustment to apply for seasonal conditions.
Calculate Bed Height Adjustments
So how do you translate the measured slope into practical bed‑height adjustments?
First, divide the total slope difference by the number of beds; a 12‑inch slope over two beds yields a 6‑inch change per bed.
Then, lower the higher‑ground bed by digging and raise the lower‑ground bed with soil or gravel, ensuring each frame sits on a level base before filling.
Reuse Soil Efficiently
When you translate a slope into a soil‑move plan, start by identifying the high and low points of each bed, then calculate how much soil must be shifted to level the surface while preserving the intended height differences.
Dig high spots, spread loosened soil into low areas, blend topsoil with compost 50/50, and layer 1–3 inches of compost to replenish nutrients, ensuring a stable, erosion‑resistant garden that feels cohesive and supportive.
Fill Sloped Raised Beds With Topsoil‑Compost Mix and Finish With Mulch or Edging
Fill the bed with a screened 50/50 topsoil‑compost blend, or adjust to a 3‑way or 50/30/20 mix if drainage or budget demand it, layering until the frame is near capacity, then tamp gently to eliminate voids.
Finish with a 2‑inch mulch layer or install edging to retain moisture, suppress weeds, and give the garden a cohesive, welcoming edge. In addition to these steps, consider incorporating a lightweight compost layer on top after the initial fill to enhance fertility while keeping drainage steady, which helps keep sloped beds productive and stable. edible greens
Give the Beds a Final Level‑Check, Ensure Proper Drainage, and Add Maintenance Tips Before Planting
After you’ve built the frames, run a string line and level across each corner to confirm the top surface is truly even, then adjust high spots or low edges as needed.
Next, dig shallow trenches at the top of the slope, install drainage tiles or surface drains, and arrange plant rows perpendicular to the grade to channel water away and prevent erosion.
Finally, test the soil pH, add a thin compost layer, set up mulch or drip irrigation, and schedule regular inspections so the beds stay level, well‑drained, and ready for planting.
Verify GradeLeveling After Construction
Even if the beds look level at a glance, you still need a systematic final check to confirm true grade‑leveling, guarantee proper drainage, and prevent future settling before planting. Use a line level on a string around corner stakes, then run a beam level across each top edge; measure any drop with a tape. Adjust high spots, tamp gravel, and re‑verify until every bed reads uniformly level.
Install Drainage and Maintenance Plan
When you finish leveling the beds, give them a final check to confirm true grade, then install the drainage system and set up a maintenance routine before planting.
Place French drains at each corner, add surface drains along walls, and lay drip‑irrigation lines with pressure‑compensating emitters to conserve water.
Verify even soil, rake smooth, and schedule periodic inspections to keep walls stable and soil healthy.
Final Note
By measuring the slope, establishing a level plane, and calculating soil adjustments, you’ve created a solid foundation for your raised beds. The 2×12 board framework, secured with pocket‑hole screws, ensures structural stability while accommodating the terrain’s grade. Filling the beds with a topsoil‑compost blend and adding mulch or edging promotes healthy drainage and plant growth. A final level check confirms the beds are ready for planting, and regular maintenance will keep them productive season after season.