First, clear any micro‑soil in the joints by sweeping away debris and loosening sand, then excavate to 4‑6 inches and lay a dense crushed‑concrete or gravel base topped with overlapping landscape fabric and a one‑inch bedding sand layer. Fill the cleaned joints with polymeric sand, sweep it in, mist lightly to activate the binder, and let it cure for 24 hours protected from rain. Compact the pavers so joints sit just below the surface, then seal the sand to prevent wash‑out. For any weeds that appear, spot‑treat with boiling water, strong vinegar, or baking soda, and keep sweeping and refilling joints regularly. Continuing this process will give you deeper insight. long‑term weed‑free patios.
TLDR
- Clean joints regularly and remove debris to prevent seed accumulation.
- Install a dense crushed‑concrete or gravel base with overlapping landscape fabric before laying pavers.
- Fill joints with polymeric sand, sweep dry sand in, then mist to activate the binder and seal the joints.
- After filling, compact pavers so joints sit slightly below surface and lightly spray water to set the polymer without washing it out.
- Use targeted DIY treatments—boiling water, high‑strength vinegar, or baking soda on emerging seedlings—and promptly refill settled joints.
Patio Weed Control: How Weeds Penetrate Joints
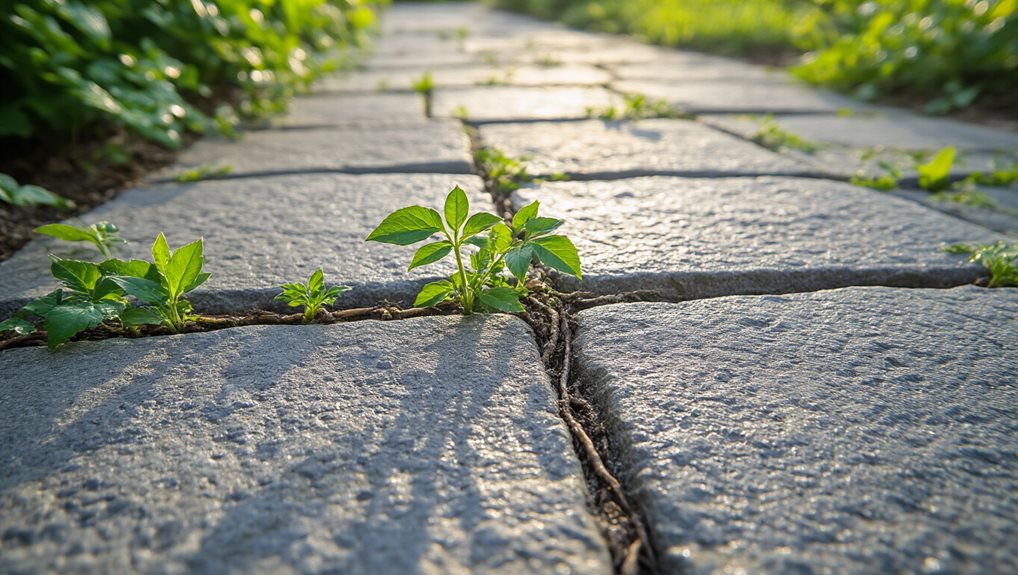
How do weeds manage to infiltrate the tiny gaps between your patio stones? Airborne seeds from trees, birds, and nearby lawn overseeding settle into joints, where debris, moisture, and eroded sand create a fertile micro‑soil.
Warm, humid climates accelerate germination, and once seedlings root, they soften sand, widen gaps, and spread, making regular cleaning and sand stabilization essential. South Florida’s warm, humid climate further speeds weed growth in these joints.
Patio Weed Control – Build a Weed‑Resistant Base
Start by excavating to the recommended depth, then lay a compacted layer of crushed concrete or gravel that creates a dense, coarse barrier; this base blocks weed seeds from rooting and stabilizes the subsoil.
Next, apply polymeric sand to the joints, letting it harden on wetting so it forms a solid, water‑resistant seal that further prevents seed settlement and erosion.
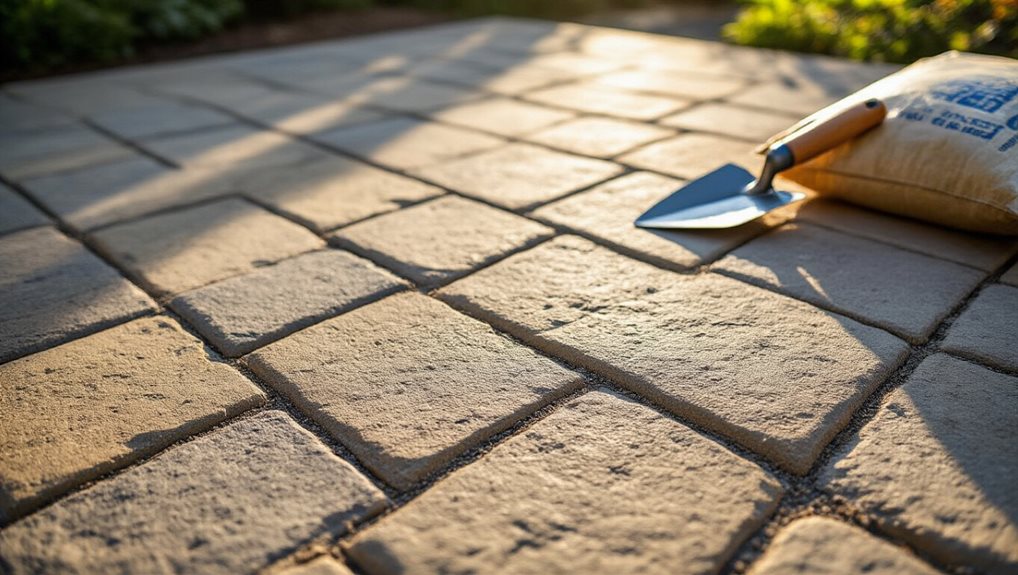
Base Preparation
Ever wondered why some patios stay weed‑free while others become a garden of unwanted sprouts? You excavate 4‑6 inches, clear vegetation, then lay overlapping landscape fabric to block seeds. Add a dense crushed‑aggregate base, compact it, and top with a one‑inch layer of sharp bedding sand, compacting again for stability. This layered preparation locks pavers, deters weeds, and creates a cohesive, lasting patio.
Polymeric Sand Application
After you’ve compacted the crushed‑aggregate base and laid the one‑inch layer of bedding sand, the next step is to fill the joints with polymeric sand, which creates a hard, water‑activated barrier that blocks weed seeds and stabilizes the pavers. Sweep dry sand into clean joints, blow off excess, mist lightly, then protect the area from rain for 24 hours; this solidifies the joints, deters weeds, and locks pavers in place.
Patio Weed Control – Install Polymeric Sand
Sweep dry paver joints after compaction, then pour fine polymeric sand blended with water‑activated binders, ensuring the surface is clean. Activate the polymers with controlled watering, creating a hard, airtight matrix that blocks taproots, ants, and moisture. This durable seal lasts years, reducing maintenance and cultivating a tidy, shared outdoor space. Mixing oils such as SAE 30 and 10W30 is not recommended for engine lubrication, as it can create intermediate viscosity that may not be optimal for engines and potentially void warranties. engine lubrication
Patio Weed Control – Seal & Stabilize Polymeric Sand to Prevent Wash‑Out
Why let rain wash away your hard‑working sand seal? You’ll start by cleaning joints, then pour polymeric sand, sweep it in, tap pavers, and compact until joints sit a hair below the surface. Lightly spray water to activate the polymer without floating it out, stop when saturated, and restrict traffic while it cures. This creates a fortified, flexible bond that blocks weeds, prevents wash‑out, and holds pavers stable for years. Regular maintenance and inspections ensure the system remains effective and the joints stay properly filled, reducing the need for costly repairs. safety
Patio Weed Control – Patio‑Specific DIY Spot Killers (Boiling Water, Vinegar, Baking Soda)
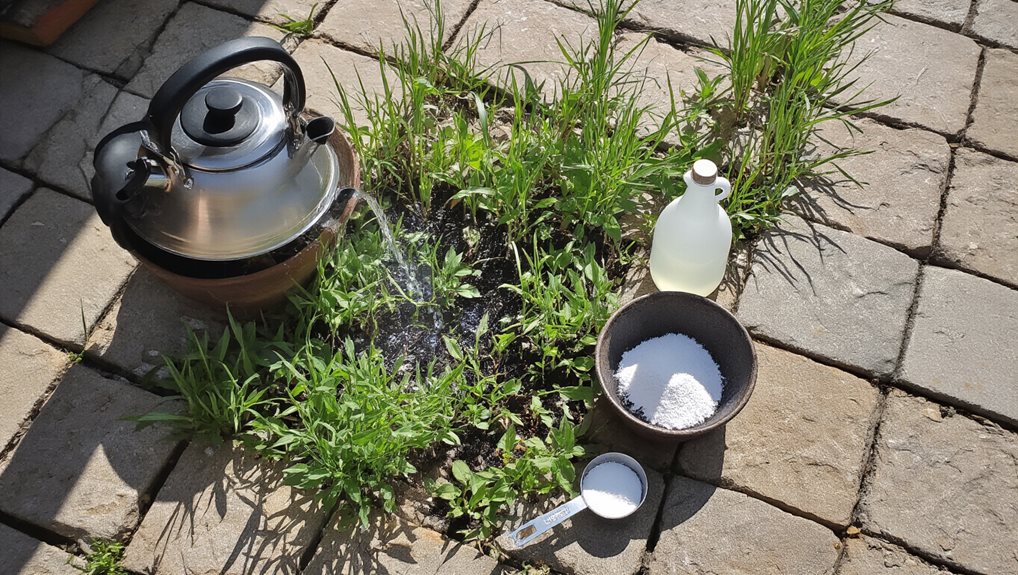
Ever wondered which kitchen‑cabinet‑style remedies actually work on weeds sprouting between patio stones?
Boiling water sears young foliage instantly, but you’ll need to repeat applications every week for stubborn roots; vinegar, at 45‑50 % concentration, burns seedlings within an hour on sunny spots, while baking soda, sprinkled into dry cracks before rain, desiccates seedlings without chemicals.
Use each method carefully, targeting only the weed‑filled joints to protect surrounding plants.
Patio Weed Control – Ongoing Maintenance & Joint Inspection
You’ll keep weeds at bay by sweeping the patio each week, which removes seeds and debris before they can germinate.
When you notice the joints have settled or sand has shifted, refill them promptly to restore the barrier that blocks root penetration.
Finally, inspect the joints monthly—especially after rain or heavy foot traffic—for cracks or erosion, and address any issues right away to maintain a solid, weed‑resistant surface.
Sweep Regularly
How often should you sweep your patio to keep weeds at bay? Sweep weekly, and add daily light sweeps after storms or heavy leaf fall, using a stiff‑bristled push broom to dislodge seeds before they germinate. Inspect joints while you sweep, collecting debris with a dustpan, and adjust frequency during seed‑heavy seasons. This routine keeps joints clean, prevents moss, and maintains a welcoming, weed‑free patio.
Refill Settled Joints
When joints settle and weeds begin to push through, refilling them promptly restores a solid barrier and keeps your patio looking pristine. Choose polymeric sand for full‑depth filling, sweep it in, then mist lightly to activate its hardening, or opt for advanced compounds like Xtreme Easy for longer durability.
Ensure joints are dry, remove old material completely, and compact the filler to prevent future weed intrusion.
Inspect for Cracks
A crack in the joint between paver stones often shows up first as a weed or moss cluster, indicating that the sand barrier has deteriorated and water can infiltrate the sub‑base. After rain or cleaning, probe joints with a screwdriver or knife, measure widths, and look for gaps even without visible weeds. Early detection prevents shifting pavers, costly repairs, and tripping hazards, keeping your patio safe and cohesive.
Patio Weed Control – Preventive Installation Tips for Future Weed‑Free Patios
A solid foundation starts with thorough ground preparation, because any leftover weed roots or debris will quickly re‑emerge through gaps in the slab. Clear the area, rake level, compact to ten inches, then spread a weed‑blocking membrane overlapping five to ten inches, staple every foot, and seal joints with tape or adhesive. Finish with polymeric sand, seal, and a protective gravel cover to keep future patios weed‑free. Regular inspections of roof and eave gaps and prompt sealing of any entry points help prevent pests from exploiting weak joints and gaps in adjacent structures attic gaps.
Final Note
By sealing joints, using polymeric sand, and applying spot‑kill treatments when weeds appear, you’ll keep your patio looking pristine and prevent invasive growth. Regular inspections let you catch early sprouts, while a well‑constructed base and proper drainage stop seeds from lodging. Combine these practices with routine cleaning, and your patio will stay weed‑free for years, preserving both aesthetics and structural integrity.