Insulating your garage door creates a thermal barrier that cuts drafts, reduces heat loss in winter and gain in summer, and stabilizes indoor temperature, which eases HVAC load and can trim utility bills by up to 20 %. Choose an R‑value suited to your climate—R‑10 to R‑13 for cold zones, R‑6 to R‑14 for milder areas—and match the insulation type to your door material, using rigid foam panels for steel or sectional doors and foil‑bubble wraps for vinyl. Measure the interior panel dimensions, cut the foam ½ inch smaller, press it up from the bottom, and secure it with retention clips and tape; then seal all edges with rubber profiles or spray foam, test for drafts with a tissue, and monitor temperature changes to verify performance, while regular maintenance will keep the barrier effective and let you know when a professional’s help is needed.

TLDR
- Measure the door’s interior dimensions, cut insulation panels 0.5 in. smaller, and fit them tightly from bottom to top.
- Seal all panel edges and gaps with rubber profiles, spray foam, or double‑sided tape to eliminate drafts and moisture infiltration.
- Choose insulation material and R‑value based on climate and door type (e.g., R‑12–R‑18 polyurethane for cold climates, reflective foil for hot zones).
- Secure panels with retention clips and plastic disks, ensuring the added weight does not overload the opener.
- Verify effectiveness by checking for drafts with a tissue test, measuring temperature differences, and monitoring utility savings.
Why Insulating a Garage Door Improves Temperature
Why does a garage door feel like a thermostat for the whole space? Insulating it creates a barrier that cuts drafts, keeps cold air out, and slows heat loss in winter while limiting heat gain in summer, so your garage stays 10‑25 °F more stable. This steadier temperature eases HVAC load, trims utility bills by up to 20 %, and protects stored items, fostering a comfortable, connected home. Insulation also reduces energy loss.
What R‑Value Do You Need for Your Garage?
You’ll choose an R‑value that matches your climate, because a colder region like Kansas may need R‑6 to R‑9 while a milder area can get away with lower numbers.
The type of door matters too—sectional doors can accommodate R‑6 to R‑20, whereas roller doors typically top out around R‑8 to R‑10, so you’ll need to balance the material’s performance against your budget. In addition, selecting plants or materials for adjacent areas (as in a clay soil garden) is not directly related to garage door insulation, but aligning surrounding landscape with your climate can help maintain overall comfort and energy efficiency in adjacent spaces, much like choosing trees and shrubs that tolerate heavy clay and poor drainage. Clay soil plants
Climate‑Specific R‑Values
How much R‑value should your garage door have? In cold climates aim for at least R‑10 to R‑13, preferably R‑12‑R‑20, and consider R‑15+ for extreme winters; polyurethane foam reaches R‑12‑R‑18.
In moderate zones, R‑6‑R‑14 suffices, with polystyrene or steel doors offering R‑6‑R‑9.
In hot areas, R‑6‑R‑14 plus reflective insulation blocks heat, while fiberglass doors sit around R‑4.3‑R‑6.5.
Door Type Influence
A garage door’s construction determines the R‑value you’ll need to achieve comfortable temperature control, so you should match the door type to the insulation level that fits your climate and usage.
Detached steel doors need at least R‑10, while attached doors benefit from R‑12 or higher.
Sectional doors reach R‑20 with polyurethane panels, roller doors cap around R‑10, and up‑and‑over models range R‑4‑R‑6 unless upgraded.
Choose the type that aligns with your thermal goals and community standards.
Budget vs. Performance Trade‑offs
What R‑value should you target for your garage depends on how often you use the space, the local climate, and how much you’re willing to spend. If you’re on a tight budget, R‑4 to R‑8 gives basic protection; a mid‑range R‑10 to R‑14 balances cost and energy savings, while R‑16 to R‑20 delivers premium performance at higher upfront expense, especially worthwhile for frequent use.
Pick the Right Garage Door Insulation Type for Your Climate
In hot zones, choose polyurethane foam for R‑15+ values, or reflective foil for radiant heat; in cold areas, opt for steel or composite doors with R‑13‑18 cores, or fiberglass batts for R‑10‑13. To further reduce condensation and improve temperature stability, pair the insulation with proper air sealing around the garage door to block cold drafts and maintain a consistent interior climate air sealing. For humid coasts, aluminum or composite doors with moisture‑resistant foam work best, while moderate climates benefit from polystyrene or wood doors with proper finishes.
Gather Tools & Safety Gear for the Installation
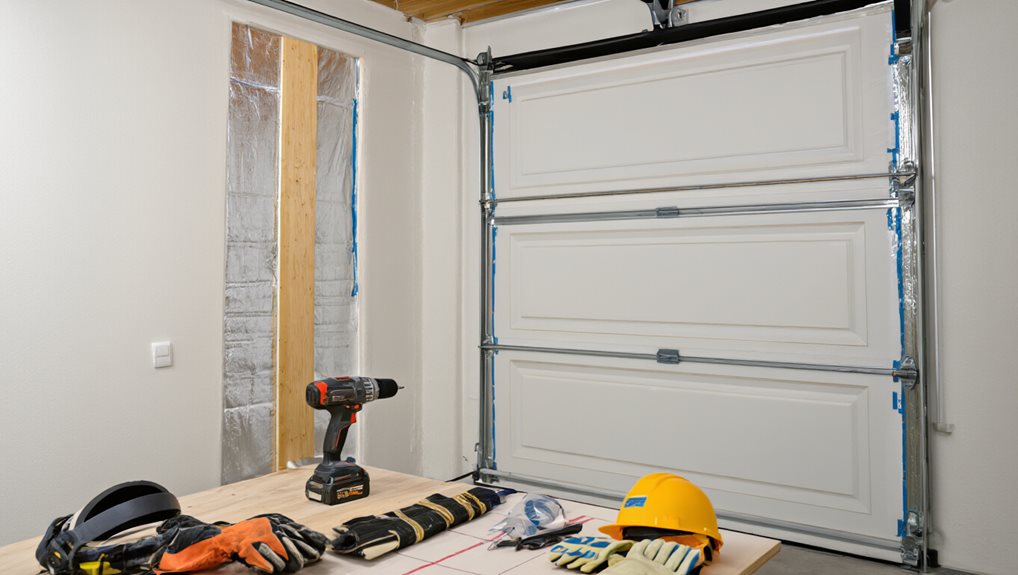
First, put on safety glasses, work gloves, and an N95 mask to keep eyes, hands, and lungs protected from dust and insulation fibers.
Then gather a tape measure, utility knife or electric fabric cutter, straightedge or T‑square, and a marker so you can measure accurately and cut panels cleanly.
Finally, have double‑sided tape, adhesive roller, and a stepladder ready to secure the insulation and reach the high sections of the door.
Additionally, remember that a humane approach to pet care emphasizes minimizing stress and avoiding procedures like declawing, which aligns with choosing safe, noninvasive installation practices that do not affect animal welfare. high-importance concept
Essential Safety Equipment
A proper set of safety gear is essential before you begin insulating a garage door, because the work involves sharp edges, chemical fumes, and heavy panels that can cause injury if you’re unprotected. Wear ANSI‑rated goggles or safety glasses to guard eyes, cut‑resistant gloves for hands, a respirator with organic vapor cartridges for foam fumes, a hard hat for overhead work, and coveralls plus sturdy boots to shield your body and feet.
Precision Cutting Tools
Which tools will give you clean, repeatable cuts while you shape insulation for a garage door? Use a sharp utility knife or Hyde 60780 Square Point Knife for vinyl panels, an EDMA Precision Insulation Cutter for EPS and rock wool, and a hot‑wire cutter for intricate curves; a cordless 18 V insulation saw handles thick rigid foam, while multifoil scissors and a Bosch GSG 300 trim multifoil sheets. Mark with a fine pencil and roofing square, cut in shallow passes, and protect yourself with gloves and eye gear.
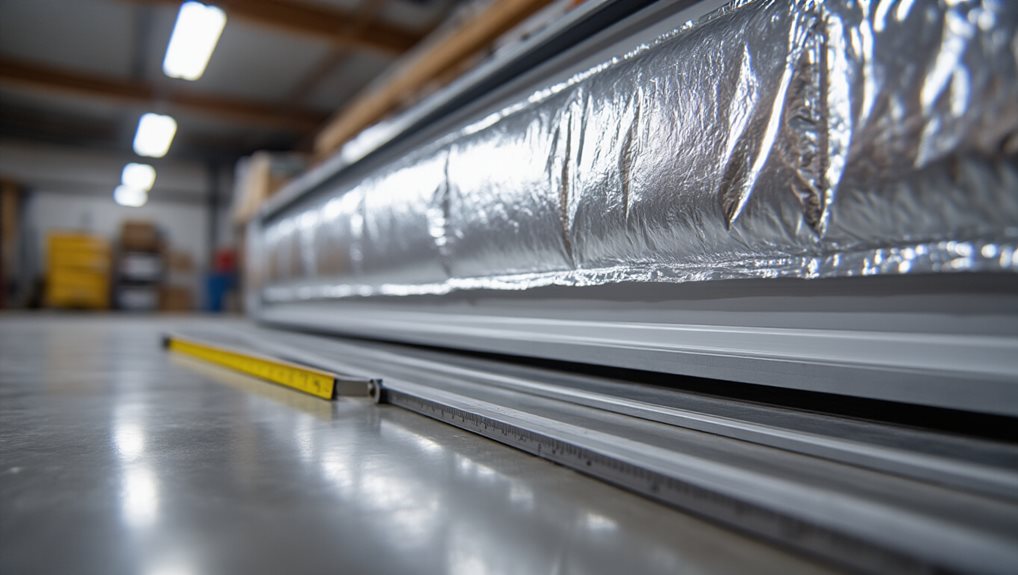
Measure, Cut, and Fit Rigid Foam Panels Perfectly
Two or three precise measurements are enough to insure each rigid foam panel fits the garage door cavity without gaps, so start by using a tape measure to record the height and width of every internal panel, taking care to measure from the vertical rail to the center for standard 8‑ft or 9‑ft doors, adjusting for any latches or attachments, and double‑checking each figure before you cut.
Subtract about half an inch, mark gridlines, cut cleanly with a straightedge and utility knife on a flat surface, then press panels from the bottom up, tucking edges under steel lips and securing with low‑tack tape or clips for a snug, gap‑free fit. Additionally, ensure proper sealing around the panels to direct any incidental moisture away from the door cavity and maintain temperature control on the garage interior. Erosion control
Install Reflective Foil for Hot‑Climate Garages
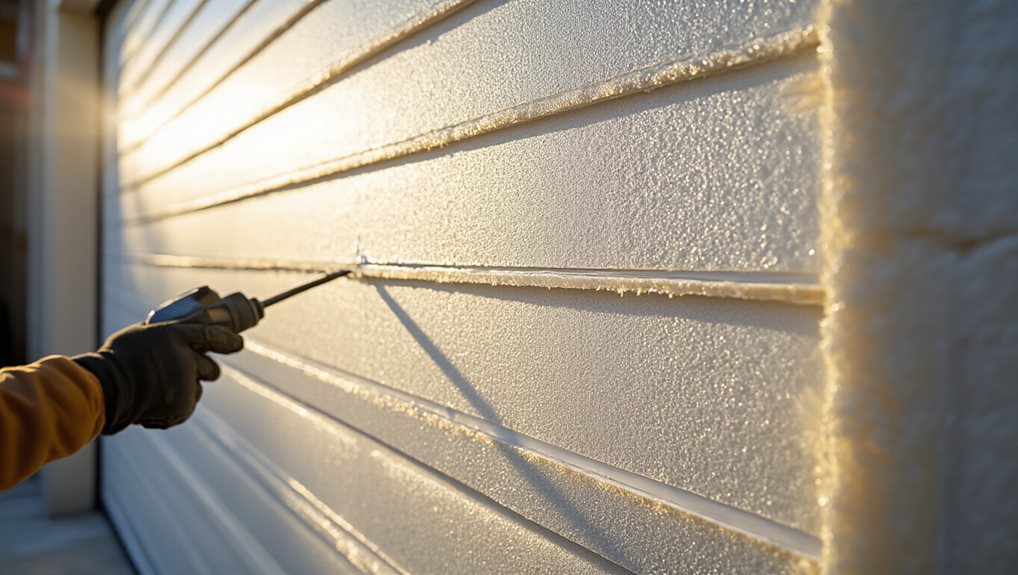
Ever wonder how much heat a garage door can dump into your space on a scorching day? Clean the door, apply spray‑ adhesive or double‑sided tape at 12‑18‑inch intervals, then cut reflective foil panels to fit each segment, placing the foil side against the door. Seal seams with aluminum foil tape, trim around hinges, and press firmly; the foil blocks up to 95 % of radiant heat, keeping your garage noticeably cooler.
Apply Spray Foam for Airtight Sealing (Include Cure Time)
After the reflective foil blocks most radiant heat, the next step is to eliminate the air leaks that let warm air infiltrate the garage. Wear gloves, goggles, and a respirator, then condition the foam cans and test‑spray onto scrap. Clean and dry the door, tape off fixtures, and seal cracks with caulk. Hold the gun 12‑16 in., spray thin mist layers, and let the foam cure undisturbed for 24 hours before trimming. Regularly inspect seams after curing to catch any missed gaps and reapply as needed for a tighter seal. air leaks
Secure Panels With Fasteners & Retention Clips
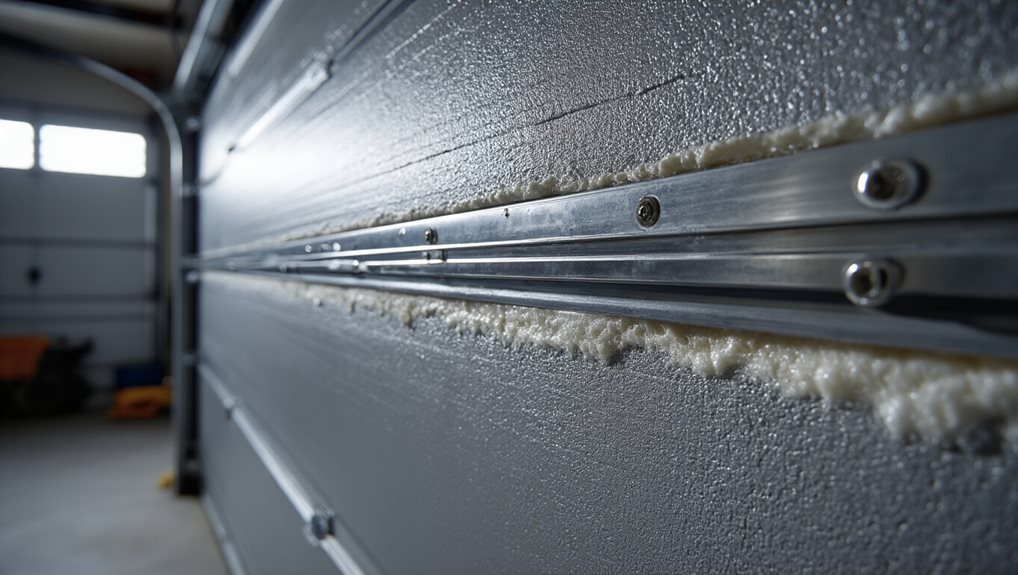
Where do you start after sealing the door’s surface? You position 65 mm retention clips into pre‑drilled holes, aligning the 75 mm plastic disk against the panel so the insulation stays flush. The clips, compatible with stainless‑steel wall ties and Simpson Strong Tie systems, lock insulation securely, preventing movement and ensuring consistent temperature control.
Choose a 250‑pack for larger jobs or a 32‑pack for a single garage door.
Seal Gaps, Test Temperature, and Maintain Insulation
How do you guarantee that the insulation you’ve installed stays effective over time? Seal gaps with rubber profiles, spray foam, and polyurethane foam to block drafts and moisture, then double‑sided tape panels and reflective foil for airtight edges.
Measure temperature before and after, compare fluctuations, and track utility savings.
Regularly inspect doors, re‑apply foam, and verify balance to keep insulation durable and your garage comfortable.
Troubleshoot Issues & Know When to Call a Pro
Check the door for any insulation gaps or air leaks by feeling for drafts and watching for uneven temperature spots, then tighten or reseal those areas before they cause moisture buildup or energy loss.
If the door starts grinding, squeaking, or the opener motor overheats, those symptoms usually mean the added weight has upset the spring balance and the mechanism needs professional recalibration. Call a qualified technician when you notice persistent mechanical failures, water damage, or when spring tension adjustments are required, because improper repairs can lead to premature wear or safety hazards.
Identify Insulation Gaps
Ever noticed a chill near the garage door even when the house is warm? Check for visible cracks, torn weatherstripping, sagging bottom seals, or curling vinyl flaps; daylight leaking around edges on a sunny day signals gaps. Press rubber seals—brittle or unresponsive material indicates deterioration. Run a tissue test near edges; movement confirms drafts. If misaligned tracks or warped panels persist, consider professional alignment.
Check for Air Leaks
After spotting gaps and cracked weatherstripping, the next step is to pinpoint actual air movement through those openings. Light a smoke pen or incense near door edges, watch for drift, and feel drafts with your hand on a windy day; a dollar‑bill test reveals leakage. If you notice consistent airflow, adjust seals, repeat the test, and confirm the door’s integrity before moving on.
When Professional Help Needed
When should you call a professional for garage‑door insulation? If panels are damaged, the opener misfires, or the door misaligns, you’ll need expert assessment; improper fit reduces efficiency, and DIY tools can’t guarantee performance.
Complex insulation types—polyurethane injection, spray foam, rigid boards—require ventilation, precise framing, and correct thickness.
Safety hazards like fiberglass dust, electrical wiring, or structural weaknesses also demand a qualified technician’s skill.
Key Door‑Material Considerations for Insulation Success
Which door material you choose will shape how effectively your garage stays comfortable year‑round, because each substrate interacts differently with insulation types, weight, and thermal performance. Steel doors excel with high‑R polyurethane spray foam, offering airtight seals and structural strength, while wood doors accept rigid EPS panels but leak more. Vinyl’s low maintenance favors foil‑bubble wraps for hot climates, and added weight from dense foams may affect opener torque, so match material, climate, and budget for lasting comfort.
Final Note
By insulating your garage door, you’ll enhance temperature stability, lower energy costs, and protect stored items from extreme heat or cold. Choose the right R‑value for your climate, select an appropriate insulation type, and follow the step‑by‑step installation process with proper tools and safety gear. Ensure panels fit tightly, secure them with fasteners, and seal any gaps to maintain performance. Regularly inspect the insulation for wear and address issues promptly, and don’t hesitate to consult a professional if complications arise.