You can soundproof a room affordably by sealing gaps with acoustic caulk and weatherstripping doors to block flanking noise. Install DIY insulating panels in windows, hang heavy curtains, and use rugs with thick pads to reduce echo and impact sound. Place acoustic panels at reflection points and reinforce outlets with putty pads. Arrange furniture to disrupt sound paths and use household items like towels as draft stoppers—effective fixes that add up. More smart, budget-friendly strategies are within reach.
TLDR
- Use heavy curtains and acoustic panels to absorb sound and reduce echoes on walls and windows.
- Layer thick rugs with dense pads to dampen footstep noise and improve floor insulation.
- Seal gaps around doors, windows, and outlets with acoustic caulk and weatherstripping to block sound leaks.
- Place bookshelves, sofas, and plants strategically to break up sound paths and absorb reflections.
- Install DIY window inserts with plexiglass or mass loaded vinyl for cheap, removable noise reduction.
Use Acoustic Panels and Foam for Immediate Sound Absorption
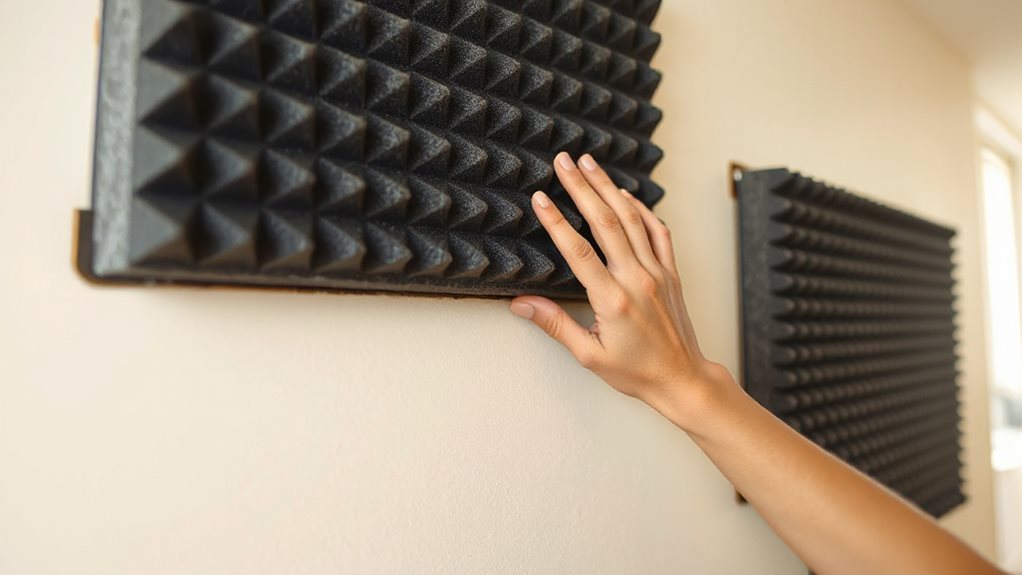
Acoustic panels and foam offer a straightforward, cost-effective solution for reducing unwanted noise and improving sound quality in any room.
You can easily install them on walls or ceilings using included kits, targeting frequencies between 250–2000 Hz where most speech occurs.
With NRC ratings from 0.6–1.0, these panels absorb 60–100% of sound, especially when placed strategically in corners or opposite hard surfaces.
This absorption occurs because sound energy is converted into heat through friction within the porous material’s microscopic structure (porous absorption mechanism).
A quality installation also benefits from using a consistent base surface and proper mounting to ensure uniform porosity and optimal performance.
Seal Door Gaps With Affordable Weatherproofing Kits
You’ve already tackled wall and ceiling reflections with acoustic panels, but sound still finds a way to sneak in—especially through the gaps around your door.
Seal those openings with affordable weatherproofing kits. Basic kits under $10 work well for minor gaps, while full $40 kits offer durable, flexible seals that cut noise by up to 10 dB—making sound feel half as loud. You can also improve security and prevent prying by pairing seals with simple locking systems like hook-and-eye or sliding-door locks for added privacy.
Block Noise Through Windows With DIY Insulating Panels

Slip a snug-fitting DIY insulating panel into your window frame, and you’ll immediately cut down on outside noise while enhancing thermal efficiency.
Build a frame filled with insulation and mass loaded vinyl, seal tightly with acoustic caulk, and add a rigid face like drywall or plexiglass.
This affordable upgrade blocks 70–80% of sound, reduces energy loss, and fits securely for easy removal—perfect for renters and homeowners alike.
Inspect seals regularly to ensure there are no cracks or gaps and reapply exterior caulk as needed to maintain both soundproofing and energy efficiency.
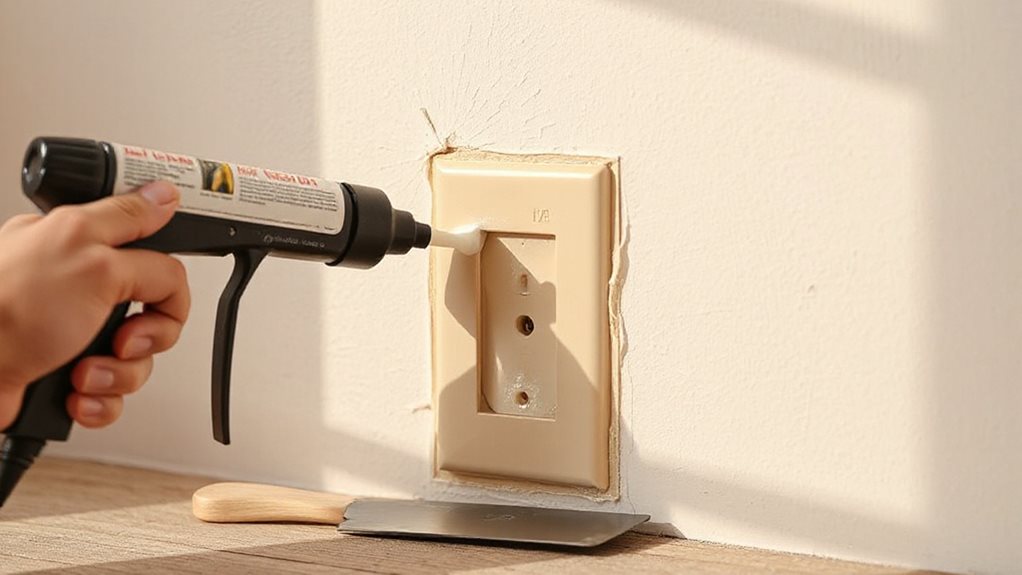
Apply Caulking to Eliminate Hidden Air Leaks
You can stop hidden noise leaks by sealing cracks around electrical outlets with acoustic caulk, which stays flexible and forms an airtight barrier over time.
Pack larger gaps with backer rod before applying a bead of Red Devil or similar acoustic sealant to make sure a complete seal that won’t shrink or crack.
This simple step, especially along wall perimeters and around windows and doors, greatly increases your room’s sound resistance without breaking the bank.
Sealing thresholds to concrete with durable waterproof sealants prevents moisture damage and helps maintain the long-term effectiveness of your acoustic seals.
Seal Cracks Around Outlets
Start by sealing the often-overlooked gaps around electrical outlets and switch boxes, where hidden air leaks can seriously undermine your room’s soundproofing.
Apply acoustic caulk where drywall meets electrical boxes to block sound paths, using a simple bead for noticeable noise reduction. Unlike regular caulk, it stays flexible, preventing cracks.
Pair with putty pads or neoprene gaskets to enhance STC ratings affordably and effectively.
Fill Gaps With Baker Rod
Compressing a backer rod into gaps before applying caulk guarantees a durable, airtight seal that greatly reduces sound leakage and enhances your room’s soundproofing performance.
Choose a rod slightly larger than the gap for proper compression, insert it into joints around walls, floors, and ceilings, then apply acoustic caulk to create a complete barrier that blocks flanking noise and improves overall acoustic comfort.
Use Red Devil Caulking
Sealing hidden air leaks with Red Devil Caulking can markedly tighten your room’s acoustic envelope, stopping sound from sneaking through unnoticed gaps.
Apply it around outlet boxes, baseboards, and drywall joints where air leaks hide.
This water-based, paintable sealant stays flexible, resists cracking, and bonds tightly for lasting performance.
Unlike basic caulk, it’s acoustically tuned to block airborne noise, making it a smart, affordable upgrade for effective DIY soundproofing.
Hang Heavy Curtains and Blankets for Quick Noise Reduction
Hanging heavy curtains or soundproof blankets is a practical and budget-friendly way to cut down on unwanted noise in your space.
You’ll block 20% to 50% of sound, especially high-frequency traffic or voices, by choosing dense, multi-layered materials with at least 1 kg/m² mass.
Use Velcro or grommets for secure installation, and seal edges tightly to enhance effectiveness, reducing noise by up to 10 decibels.
Regularly monitor for new entry points and maintain seals to keep the room insulated from drafts and noise, which also helps prevent pests like cracks and holes that can undermine your soundproofing.
Install Door Sweeps to Close Off Floor-Level Sound Paths
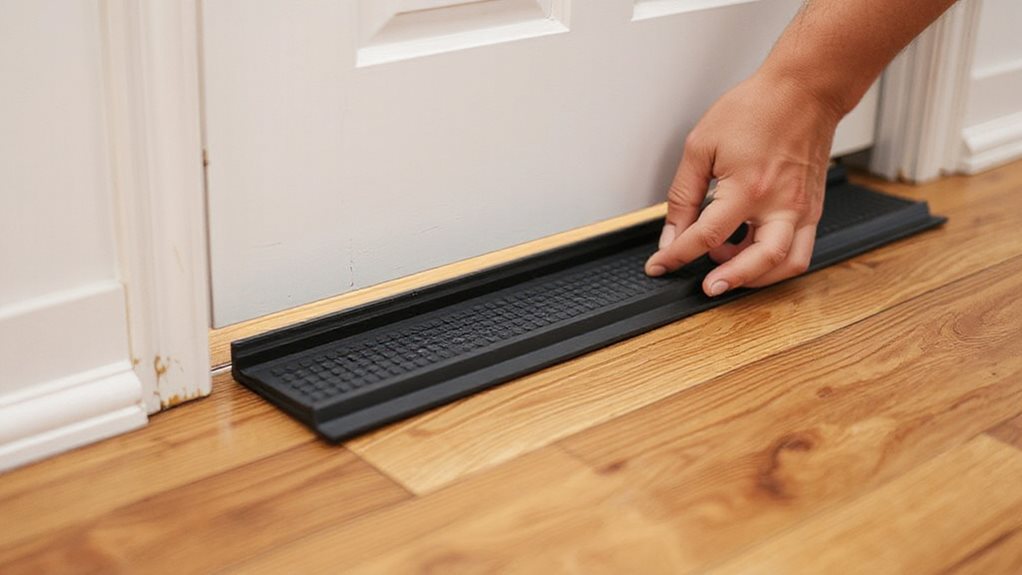
At the base of every door, even the sturdiest ones, small gaps often go unnoticed—but they’re prime pathways for sound to sneak in or escape.
Install a rubber or silicone door sweep to seal these openings, cutting up to 4 dB of noise. Choose one that matches your floor’s levelness for full contact, and pair it with side seals to maximize soundproofing effectiveness efficiently and affordably.
Upgrade Window Seals With Gaskets and Weather Stripping
Start by sealing any bottom gaps in your windows with acoustic caulk to block sound paths and prevent drafts.
Then, install durable weather stripping—like V-strip or rubber gaskets—along the sash and frame edges to create a tight seal when the window closes.
For extra noise reduction, add rigid foam inserts behind the weather stripping to stiffen the barrier and minimize vibration.
Seal Bottom Gaps First
You can’t afford to ignore the gaps at the bottom of your doors and windows—these openings act as invisible highways for sound, letting noise sneak into your room just as easily as if a window were wide open.
Seal them first with acoustic sweeps or automatic drop seals, which compress tightly to block sound and air. Pair with threshold gaskets to stop flanking noise, enhance your wall’s STC by up to 10 points, and create a quieter, more private space you can truly relax in.
Install Durable Weather Stripping
Upgrade your window and door seals with durable weather stripping to close off hidden sound pathways that undermine even the best-insulated rooms.
Use silicone or EPDM rubber gaskets, which stay pliable and seal tightly, especially around wood or metal frames.
Properly sealed, they enhance soundproofing greatly, cut energy costs by 10–20%, and improve air quality—simple upgrades that make your space quieter, more comfortable, and truly yours.
Use Rigid Foam Inserts
After sealing gaps around windows and doors with durable weather stripping, the next step is to address the window itself—specifically, the glass surface, which often acts as a weak point for sound transmission.
You can install rigid foam or acrylic inserts inside the frame, creating a dead air gap that reduces noise by up to 80%. These inserts fit securely with magnets or screws, seal tightly with gaskets, and enhance both soundproofing and thermal efficiency without permanent changes—ideal for renters or historic homes.
Maximize Furniture Placement to Disrupt Sound Waves
Arrange your furniture strategically to disrupt sound waves and improve room acoustics without breaking the bank.
Place upholstered sofas and chairs against shared walls to absorb sound, while bookshelves with books scatter reflections.
Break up open spaces using plants or fabric dividers, and avoid parallel surfaces to reduce echoes.
Position seating centrally, preserving clear sound paths for balanced, natural listening.
Layer Rugs and Carpets to Dampen Impact and Echo

You can markedly cut down on echo and footstep noise by choosing thick, dense rugs with deep piles, like wool or shag styles, which trap sound waves and reduce airborne noise by up to 46%.
Layer a rug pad under area rugs or add a second rug over existing carpet, especially in high-traffic spots, to enhance impact absorption and block vibrations before they travel.
Placing these layered setups near noise sources—like under desks or beside beds—gives you smarter, more effective sound control without costly upgrades.
Choose Thick, Dense Rugs
Lay down thick, dense rugs to substantially reduce both impact noise and room echo, starting with options at least half an inch thick to maximize sound absorption through deeper fiber layers.
Choose high-density materials like wool or felt with pile heights of 10–18 mm, as they trap sound waves more effectively than loose weaves.
Pair with a quality pad for even better results, especially in high-traffic areas.
Layer Rugs for Maximum Effect
A well-executed layering strategy can markedly enhance your room’s sound control, especially when you combine a larger, dense base rug with a smaller, textured top rug to create multiple barriers against noise.
You increase absorption by adding permeable air spaces and high-quality pads—felt or jute work best—while wool or synthetic blends improve mid-frequency damping, reducing echo and impact sound effectively.
Place Strategically Near Noise Sources
Near the most active areas of your space, positioning rugs and carpets strategically makes a measurable difference in controlling both impact noise and airborne echo.
Place thick, layered rugs where foot traffic or furniture movement occurs, and pair them with high-density underlay to dampen sound.
Target entryways, stairs, and shared walls—common noise pathways—to reduce transmission and create a quieter, more connected living environment.
Reinforce Electrical Outlets and Wall Cracks With Sealants
While sound can easily sneak through the smallest openings, sealing electrical outlets and wall cracks stops a significant portion of noise transfer without breaking the bank.
Use acoustical putty pads on outlet boxes, apply sealant around gaps, and install box seals for airtight fronts. These UL-classified, resilient materials block sound, smoke, and fire, maintaining STC ratings—simple, effective upgrades anyone can do.
Use Household Items Creatively for No-Cost Sound Control
Tap into what you already own to cut down noise—common household items can pull double duty as effective, no-cost sound control solutions.
Place rugs near doors to absorb sound, use thick curtains for full window coverage, and roll towels into draft stoppers at door bases.
Layer carpets with pads under furniture to dampen vibrations, and seal gaps with DIY caulk alternatives like putty or foam—simple fixes that work.
Final Note
You’ve taken smart, affordable steps to reduce noise effectively. By combining acoustic panels, weatherstripping, and heavy fabrics, you’re absorbing sound and sealing leaks without overspending. Strategic furniture placement and layered rugs further dampen echoes and vibrations. Simple fixes like caulking gaps and using household items enhance results. These methods, grounded in sound physics, deliver real improvement. With consistency and attention to detail, you’ve created a quieter, more comfortable space—proving effective soundproofing doesn’t require a big budget, just practical, thoughtful actions.