To seal drafty windows and reduce energy costs by up to 15%, start by inspecting for visible cracks and gaps using the candle test on windy days. Apply paintable silicone or latex caulk at a 45-degree angle to exterior frames, ensuring surfaces are clean and dry. Install appropriate weatherstripping like foam tape or V-strip around window sashes, measuring precisely for effective sealing. Consider insulating plastic film for additional protection, which can reduce heat transfer by up to 50% while maintaining consistent indoor temperatures and enhancing overall efficiency through thorough sealing strategies.
TLDR
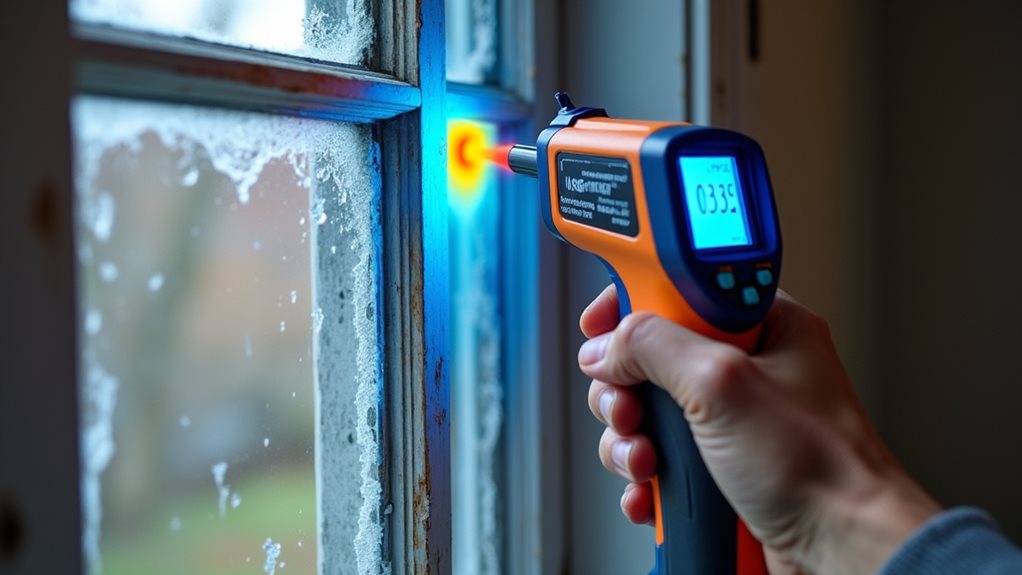
- Inspect windows on windy days using candle tests or dampened hands to detect drafts through cracks and gaps.
- Apply exterior-rated silicone or latex caulk at 45-degree angles to seal visible cracks and damaged areas.
- Install weatherstripping like foam tape or V-strip on clean window stops to create effective air barriers.
- Use insulating plastic film as supplementary protection to reduce heat transfer by up to 50 percent.
- Consider ENERGY STAR certified window replacement for permanent solutions that reduce energy bills by 12-15 percent.
Inspecting Your Windows and Planning Your Sealing Strategy
Before you can effectively seal your windows, you’ll need to conduct a thorough inspection to identify problem areas and develop a strategic approach for addressing air leaks.
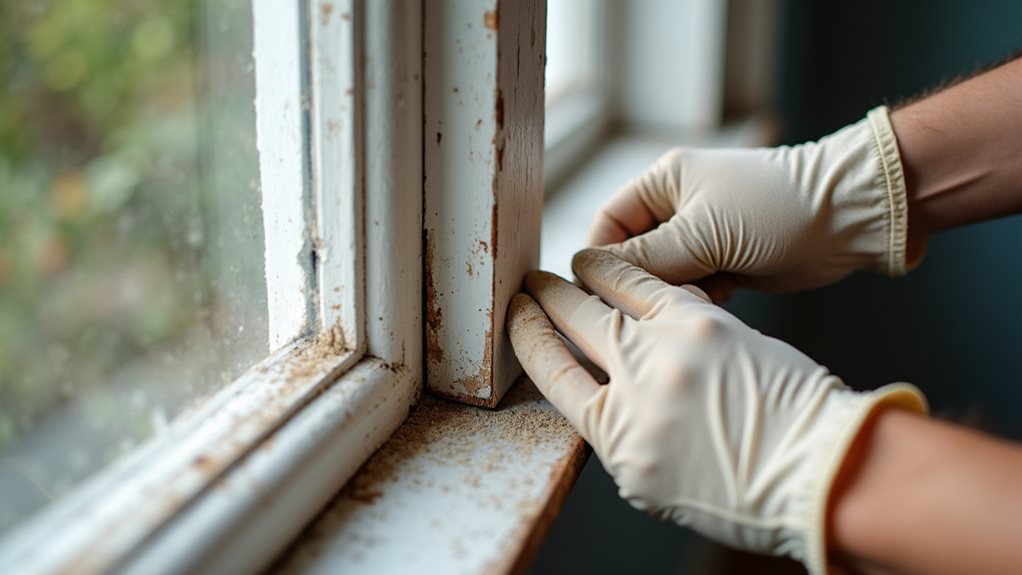
Start by examining window frames for visible cracks, gaps, or damaged caulking. It’s important to ensure that the surrounding areas are dry and free from moisture, as this aids in the proper application of sealing materials and prevents future issues with curing and setting.
Use the candle test or dampened hand technique to detect drafts, then prioritize sealing windows showing the most significant leaks. For best results when testing for air leaks, conduct your inspection on windy days when drafts are most easily detected.
Applying Caulk and Sealants to Window Frames
Once you’ve completed your window inspection and developed your sealing strategy, you’ll need to select the appropriate caulk or sealant for your specific window materials and environmental conditions.
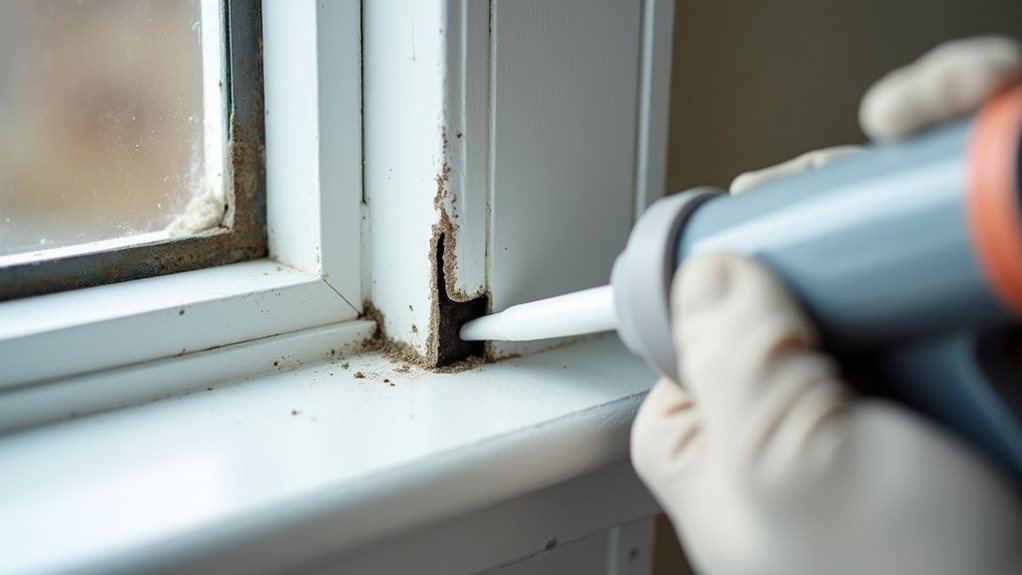
Your success depends heavily on choosing paintable silicone or latex caulk that’s rated for exterior use and compatible with your window frames, whether they’re wood, vinyl, or aluminum. Silicone caulk is particularly ideal for moist areas due to its flexibility and long-lasting properties.
Perfecting proper application techniques, including maintaining a 45-degree angle with your caulking gun and working in small sections, will guarantee you achieve a professional-quality seal that protects against drafts and moisture infiltration. Before beginning the application process, ensure the window frame and surrounding areas are completely clean and dry, as any dirt or moisture can prevent proper adherence of the new caulk.
Choosing the Right Sealant
When selecting the appropriate sealant for your window frames, you’ll need to contemplate several critical factors including the window material, location, and environmental conditions the sealant will face.
Silicone sealants excel for exterior applications due to their flexibility, durability, and weather resistance, while acrylic latex works well indoors where paintability matters for aesthetic finishes.
Proper Application Techniques
Success in sealing windows depends heavily on careful preparation and precise application techniques that guarantee a durable, weather-tight seal.
Hold your caulking gun at a 45-degree angle, maintaining steady pressure while keeping the nozzle against the surface.
Work in manageable sections, applying uniform beads without over-application.
Smooth each section immediately using a dampened finger or tool for professional results.
Installing Weatherstripping Around Window Sashes
When you’re ready to install weatherstripping around your window sashes, you’ll need to select the appropriate material based on your specific window type and the gaps you’ve identified during inspection.
The three most common options include foam tape for simple applications, V-strip for sliding windows, and tubular rubber for areas requiring more substantial sealing power. Additionally, using a quality primer before painting window frames can help improve adhesion and durability, ensuring a long-lasting finish for your energy-efficient upgrades.
Once you’ve chosen your weatherstripping material, you’ll follow a systematic installation process that involves measuring, cutting, and securing the material to create an effective barrier against drafts and energy loss.
Choosing Weatherstripping Materials
Although selecting the right weatherstripping material might seem overwhelming given the numerous options available, understanding each type’s characteristics and applications will help you make an informed decision that maximizes your window’s energy efficiency and longevity.
Consider felt for cost-effective solutions, foam tape for irregular gaps, tubular rubber for durability, V-strip for sliding windows, and magnetic strips for metal frames.
Installation Step Process
With the right weatherstripping material selected for your specific window type and conditions, you’re ready to begin the installation process that will convert your drafty windows into energy-efficient barriers against outdoor elements.
Clean window stops and edges thoroughly, removing old adhesive residue. Measure all four sides accurately, cut weatherstripping to precise lengths, then apply by pressing firmly for proper adhesion.
Using Insulating Plastic Film for Enhanced Energy Efficiency
Since traditional window sealing methods sometimes fall short in older homes or during extreme weather conditions, insulating plastic film offers a supplementary solution that can dramatically improve your home’s energy efficiency.
This thin polyester layer creates an insulating air barrier, reducing heat transfer by up to 50% while eliminating drafts and maintaining consistent indoor temperatures year-round.
Additional Methods to Reduce Window Drafts

Beyond plastic film installation, several proven techniques can further minimize window drafts and enhance your home’s thermal performance.
Re-caulking deteriorated seals and replacing worn weatherstripping effectively blocks air infiltration around frames and sashes.
Draft stoppers placed at window bases, thermal curtains creating insulating barriers, and professional-grade sealants filling frame gaps provide extensive draft protection while improving energy efficiency.
Long-Term Window Replacement Solutions
When temporary sealing methods no longer provide adequate draft protection, investing in complete window replacement delivers the most thorough and permanent solution for eliminating air infiltration.
Modern ENERGY STAR certified windows reduce energy bills by 12-15% nationwide, offering double- or triple-pane insulated glass with low-emissivity coatings, gas fills, and advanced frame materials that minimize conductive heat loss while maximizing comfort.
Maintaining Your Window Seals for Lasting Results
Whether you’ve installed new windows or applied fresh sealant around existing ones, regular maintenance determines how long your sealing efforts will protect your home from drafts and energy loss.
Inspect seals monthly for cracks, gaps, or moisture damage, and clean them with mild soap and water to remove debris that compromises effectiveness.
Final Note
You’ve now learned thorough techniques to eliminate window drafts and enhance your home’s energy efficiency. By inspecting your windows, applying proper caulk and weatherstripping, installing plastic film, and implementing additional sealing methods, you’ll markedly reduce energy costs. Remember that regular maintenance guarantees lasting results, while planning for eventual window replacement provides long-term solutions. These practical steps will change your home’s comfort level while producing measurable savings on heating and cooling expenses.