To install a shower valve body, you’ll need to gather essential plumbing tools and safety gear before shutting off the main water supply. Position the valve body 38-48 inches from the floor, ensuring it’s level and plumb within the wall cavity. Install secure support blocks between studs, then connect water supply lines using appropriate pipes and fittings with plumber’s tape. After checking all connections for leaks, proper testing and trim installation will complete your professional-grade setup.
TLDR
- Shut off the main water supply and gather necessary tools including wrenches, pliers, screwdrivers, plumber’s tape, and valve body.
- Install support blocks between wall studs at 38-48 inches from the floor, ensuring they’re level and securely fastened.
- Position the valve body plumb and level in the wall cavity, maintaining proper clearance for trim installation.
- Connect hot and cold water supply lines to valve inlets using appropriate pipe materials and Teflon tape.
- Test all connections for leaks and verify proper temperature settings using a thermometer test kit after installation.
Essential Tools and Materials Needed
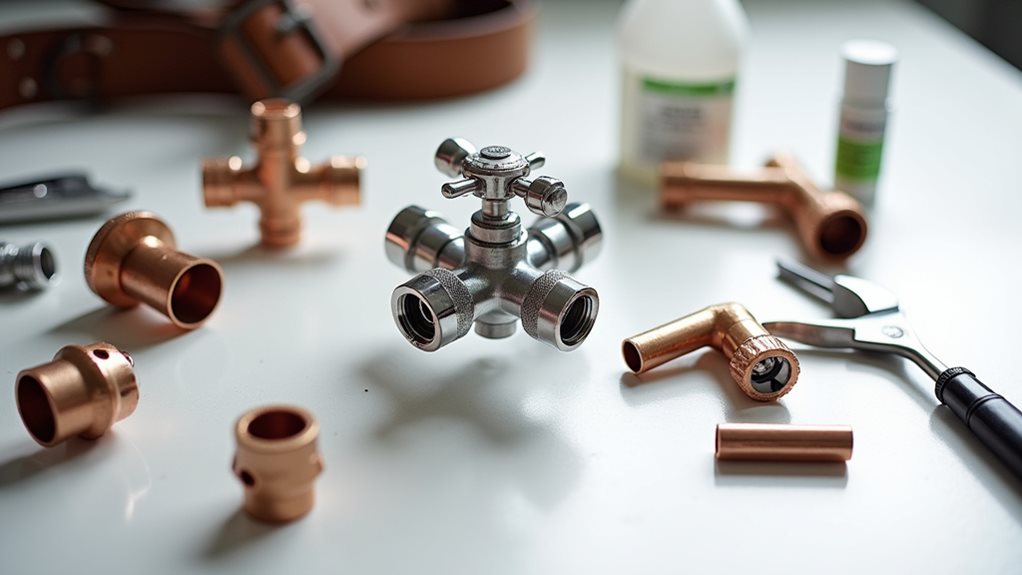
Four main categories of tools and materials are essential for successfully installing a shower valve body: basic hand tools, plumbing supplies, specialized soldering equipment, and safety gear.
You’ll need wrenches, pliers, and screwdrivers for assembly, along with plumber’s tape, caulk, and the valve body itself. A thermometer test kit should be included to verify proper temperature settings once installed. Additionally, be aware that drywall installation often requires specific tools to ensure a smooth finish when working around the valve.
For copper systems, don’t forget your torch, solder, and flux paste, while safety equipment includes goggles and gloves.
Preparing Your Work Area
Before starting your shower valve installation, you’ll need to gather all essential tools and materials in one organized location to prevent interruptions during the project.
Once you’ve collected your supplies, clear out the entire shower area and surrounding workspace, removing any items that could obstruct your movement or access to plumbing connections. Additionally, be aware of potential water heater leaks that may arise during plumbing work, as addressing them promptly can save you from costly repairs.
For safety and efficiency, protect nearby surfaces with drop cloths and make certain you have adequate lighting to see all components clearly during the installation process. Remember to locate your main water shut-off valve and turn it off completely before beginning any work.
Gather Essential Tools First
Successful shower valve installation begins with gathering the right collection of tools and safety equipment in your work area.
You’ll need an adjustable wrench, pipe wrenches, and Teflon tape for proper connections, along with safety goggles and gloves for protection.
Don’t forget essential measuring tools like a tape measure and level to guarantee accurate alignment of your valve components.
Clear Installation Space
Preparing a clear and organized workspace serves as the foundation for a smooth shower valve installation process.
You’ll need to remove all toiletries, towels, and decorative items from the area while ensuring adequate lighting for visibility.
Set up dust sheets to protect surrounding surfaces, verify unobstructed access to plumbing connections, and clear away any furniture that might block your movement during installation.
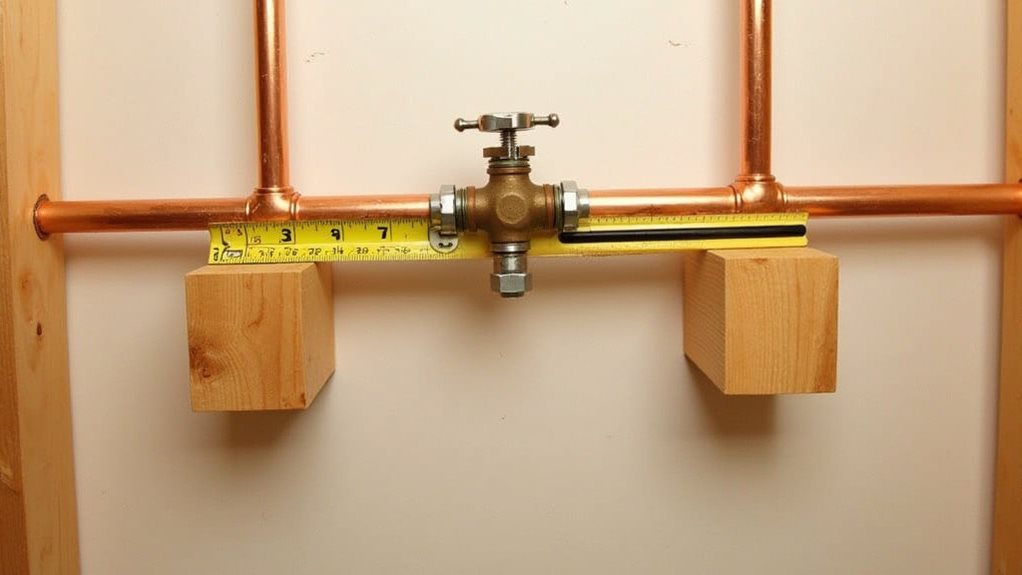
Proper Valve Body Positioning

The correct positioning of your shower valve body requires careful attention to height, wall depth, and center line measurements to guarantee peak functionality and user comfort.
You’ll need to mount the valve body plumb and level, typically 38-48 inches from the floor, while maintaining proper clearance within the wall cavity for trim installation.
When determining the final position, consider your specific shower configuration and measure carefully from the center line of the drain to establish the valve’s horizontal placement, confirming it’s perfectly aligned with other shower components. Additionally, ensuring that the valve body can handle the hot water demand is crucial for consistent performance during peak usage times.
Height and Wall Depth
Proper valve body positioning involves two critical measurements that can make or break your shower’s functionality: height from the floor and depth within the wall.
Install your valve body between 38 to 48 inches above the shower floor, following ADA recommendations for accessibility.
For wall depth, you’ll need to account for a rough-in measurement of 2.5 to 4.5 inches, depending on your wall materials.
Plumb and Level Mounting
Since accurate positioning forms the foundation of a successful shower valve installation, you’ll need to confirm your valve body sits perfectly plumb and level within the wall cavity.
Use a level tool to check both vertical and horizontal alignment, and secure the valve with 1.5-inch screws through reinforcement blocking or studs.
Ascertain there’s adequate clearance around the valve while maintaining sturdy mounting points that prevent shifting during operation.
Center Line Measurement
After ensuring your valve body maintains perfect plumb and level positioning, accurate center line measurement becomes your next key focus.
You’ll need to measure 2-3/16 inches (56mm) from the finished wall surface to the valve’s center line, accounting for drywall and tile thickness.
Check your manufacturer’s specifications, as requirements may vary, and use your backer board to secure the valve at the proper depth.
Installing Support Blocks
Installing sturdy support blocks serves as a critical foundation for your shower valve body installation.
You’ll need to secure wood or plastic blocks between the wall studs to guarantee proper structural support and meet local building codes. Additionally, consider how deer are attracted to sweet potatoes if you’re planning on using your bathroom space for gardening projects that may involve these plants. When mounting the blocks, make certain they’re level and aligned with your marked centerline, then fasten them securely using 2-inch or 3-inch mounting screws for maximum stability.
Connecting Water Supply Lines
The three most critical steps in connecting water supply lines begin with proper preparation and material selection.
You’ll need to shut off the water supply completely and relieve pressure before proceeding.
Then, carefully connect your chosen pipes – whether copper, PEX, or braided stainless steel – to the valve inlets using Teflon tape and appropriate fittings, ensuring they’re securely tightened without over-torquing.
Testing and Quality Checks

Proper testing and quality checks serve as critical safeguards before finalizing your shower valve installation.
Start by checking all connections for leaks while testing the valve’s pressure-balancing capabilities.
You’ll need to verify temperature control settings, guarantee proper water flow, and confirm that the mounting bracket remains stable.
Don’t forget to inspect the cartridge alignment and test all operational controls thoroughly.
Final Trim Installation
Once all testing and quality checks are complete, you’ll need to focus on installing the final trim components that give your shower its finished appearance.
Start by positioning gaskets and securing the trim plate over the valve body, ensuring proper alignment with mounting holes.
Install the stem covers with O-rings, attach the handle, and finish by applying silicone caulk around the edges for a watertight seal.
Final Note
Now that you’ve completed your shower valve installation, you’ll appreciate having done the job correctly with proper support blocks, secure connections, and thorough testing. If you’ve followed each step carefully, you’ll have a professionally installed valve that’ll provide years of reliable service. Remember to keep your installation documents and any leftover parts for future reference, and don’t hesitate to contact a professional if you encounter any issues during operation.