You can test your home for mold by starting with a focused visual inspection of bathrooms, basements, kitchens, attics and HVAC areas, looking for staining, fuzz, warped materials or musty odors. Use surface methods (tape lifts, swabs, small bulk samples) plus air sampling with calibrated spore traps and outdoor controls to quantify spores. Map moisture with pin or pinless meters and thermal imaging to find hidden wetness. Send samples to a lab for microscopy or PCR, and keep reading to learn next steps.
TLDR
- Start with a thorough visual inspection of bathrooms, kitchens, basements, attics, and HVAC for stains, fuzz, peeling, or musty odors.
- Use moisture meters and thermal imaging to find hidden dampness that supports mold growth before sampling.
- Collect surface samples (tape lifts, swabs, or small bulk pieces) from suspicious areas, following PPE and chain-of-custody practices.
- Perform air sampling with calibrated spore traps or settle plates and include outdoor control samples for comparison.
- Send samples to an accredited lab for microscopy for screening or PCR for species-level identification and remediation verification.
Visual Inspection: What to Look For and Where to Start
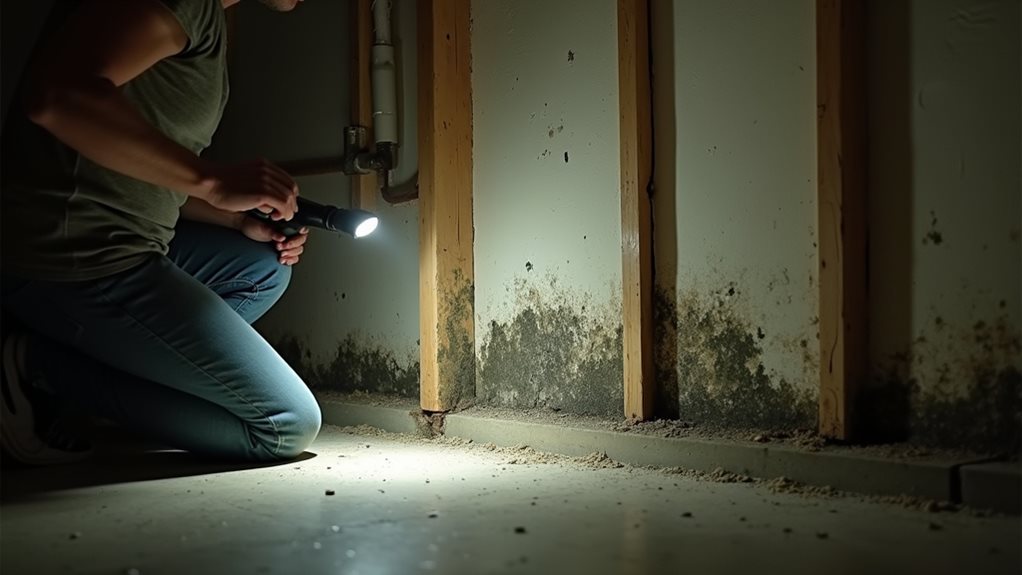
Because mold needs moisture to grow, your visual inspection should focus on places where water collects or where you’ve seen staining before, and you’ll want to move methodically through the house so you don’t miss hidden problem spots.
Check bathrooms, basements, attics, kitchens, and HVAC components for fuzzy colonies, dark or spreading discoloration, peeling paint, warped wood, and persistent musty odors suggesting unseen moisture intrusion. Additionally, be aware that drywall dust can also indicate underlying moisture issues when present in areas of mold growth. Moisture meters and thermal imaging can help locate hidden sources of dampness when visual signs are absent, so consider using moisture and thermal assessment.
Surface Sampling Techniques: Tape Lifts, Swabs, and Bulk Samples
When you suspect mold on a surface, three common sampling approaches—tape lift collection, swab sampling, and bulk sample removal—let you capture evidence in different ways depending on the material and the question you need answered.
Tape lifts press clear adhesive onto flat, dry areas to preserve spore arrangement for quick laboratory microscopy, while swabs use a sterile, absorbent tip to sample irregular or textured surfaces and are typically placed in a preservation medium for transport. Disturbing materials that may contain black mastic asbestos can also release harmful fibers, similar to how mold spores are released.
For definitive identification when mold is growing on or within building materials, bulk sampling removes a small piece of the substrate so labs can analyze the mold in its natural context, though this is more invasive and may require repair. These methods each have limitations and should be combined with air sampling and professional assessment to get a comprehensive view.
Tape Lift Collection
Tape lift sampling offers a quick, low-cost way to collect surface mold for microscopic analysis, and it’s especially useful on smooth, dry surfaces where spores retain their spatial orientation.
You’ll press clear tape gently onto a clean patch, lift slowly holding edges, then mount it on a labeled slide or plastic bag.
Wear gloves and an N-95, seal samples, and document chain-of-custody.
Swab Sampling Procedure
Gathering swab samples is a straightforward, targeted way to confirm the presence and identity of mold on surfaces, and doing it correctly will give labs the best chance to provide useful results.
Wear PPE, swab visible colonies or dust until the tip discolors, then seal the swab in a sterile transport tube.
Sample multiple representative spots; labs use microscopy or molecular tests to ID species.
Bulk Sample Removal
You’ve already seen how swabs can confirm mold on localized spots; for a more definitive image, bulk sample removal collects an actual piece of the contaminated material so labs can analyze the growth in its native setting.
You’ll remove a small section (about 2″ x 2″) of drywall, carpet, or wood, preserving structure for culture or microscopy, enabling accurate species ID despite higher cost and slight demolition.
Air Sampling Methods: How Professionals Measure Indoor Spores
When you test indoor air for mold, professionals most often use spore trap sampling with calibrated pumps to capture airborne particles onto adhesive media for microscopic counting.
You’ll hear about active methods, which draw a measured air volume with devices like impactors, versus passive settling plates that collect spores over time, and each approach has trade-offs for speed and representativeness.
Keep in mind that environmental factors — ventilation, humidity, time of day and outdoor spore levels — can strongly influence results, so samples are usually taken from several locations and compared to outdoor controls. Additionally, maintaining a clean environment can help eliminate spider food sources and reduce the likelihood of mold growth by minimizing damp areas where mold thrives.
Spore Trap Sampling
Professionals commonly use spore trap sampling to quantify airborne mold spores, a method that captures particles on a sticky-coated cassette attached to a calibrated air pump so you can compare indoor levels to outdoor baselines.
You’ll see devices like Air-O-Cell run at ~15 L/min for 5–10 minutes, then cassettes are sealed, labeled, double-bagged and sent for microscopic analysis reporting spores/m^3 and percent types.
Active vs. Passive
Although both passive and active air sampling aim to characterize indoor spores, they work in fundamentally different ways and suit different purposes, so you’ll want to choose the method that matches your sampling goals and site conditions.
Passive sampling uses settle plates or exposed filters for long, low-cost monitoring but misses tiny, suspended spores; active sampling uses pumps for rapid, quantitative CFU/m³ results, requiring equipment and power.
Environmental Influences
Because air movement, humidity, and building systems strongly affect where spores travel and settle, you should consider environmental conditions as you plan air sampling so your results reflect real exposure risks.
Use calibrated pumps and spore traps, sample multiple rooms and outdoors simultaneously, note HVAC operation and moisture, and send sealed samples to accredited labs for microscopic and culturable analysis to interpret indoor versus outdoor spore levels.
Moisture Detection Tools: Finding Hidden Sources of Mold
Start by scanning your home with the right moisture detection tools, because hidden dampness is the most common precursor to mold growth and early identification can save time and money.
Use pinless and pin meters for non‑destructive and targeted readings, thermal cameras to spot hidden pockets, flashlights for visual checks, and probes when deeper measurement is needed; map and monitor moisture levels regularly.
Laboratory Analysis Options: Microscopy vs. DNA Testing

Choose the right laboratory method by evaluating what you need to know and how quickly you need it: microscopy gives you rapid, cost‑effective visual confirmation of mold genera and overall spore load, while DNA testing (PCR) delivers species‑level precision and far greater sensitivity for low‑level or hard‑to‑culture organisms.
Use microscopy for quick screening; choose PCR when you need definitive species ID, higher sensitivity, or remediation verification.
Working With Professional Inspectors: What to Expect and Next Steps
When you call in a professional inspector, they’ll start by taking a detailed history of your property’s moisture and mold concerns, asking about past water damage, visible stains, and any persistent musty odors so they can focus the inspection where it matters most.
They’ll perform a thorough visual walkthrough, use moisture meters and infrared scans, collect targeted samples, deliver a written report, and recommend certified remediation and verification steps.
Final Note
You can effectively assess your home for mold by combining careful visual checks, targeted surface and air sampling, and moisture detection tools to find hidden sources; lab analysis—either microscopy or DNA testing—then confirms species and guides remediation. If results show increased mold or you find extensive growth, hire a qualified inspector who’ll document issues, recommend containment and removal, and verify clearance after cleanup. Acting promptly reduces health risks and prevents further structural damage.